For some time, Python has had support for managing virtual environments. Python 3.3 even added the built-in module venv for creating environments without third-party libraries. There are a number of different tools Python programmers use to manage their environments and the one I use is called virtualenvwrapper.
Virtual environments are a way of separating your Python project and its dependencies from your system-installed Python. If you use a Mac or a Linux-based operating system, it very likely comes with a version of Python as part of the installation, and in fact will likely be dependent on that particular version of Python in order to function properly. But it’s your computer, and you may want to use it for your own purposes too. You may need to install another version of Python than the operating system provides. You may need to install some additional libraries too. Though it’s possible to upgrade your system Python, it’s not recommended – and though it’s possible to install additional libraries – care must be taken not to interfere with anything the system relies on.
Virtual environments are key to creating the isolation you need to safely tinker with different versions of Python and different combinations of packages. They also allow you to install different versions of the same library for different projects, which resolves what would be impossible if all your projects’ requirements were installed in the same environment.
Why virtualenvwrapper over other tools? In short:
- Rather than have a
venvdirectory inside or alongside your project directory, virtualenvwrapper keeps all your environments in one place:~/.virtualenvsby default - It provides commands for creating and activating environments easily, and the activation doesn’t rely on locating the right
activatescript – so it’s justworkon flashylights(from anywhere) rather thansource ~/Projects/flashylights-env/bin/activate
Getting started
First of all, it’s important to take the time to understand how your system Python is configured, and a bit about how the pip tool works.
To use the Raspberry Pi OS as an example, the operating system comes with both Python 2.7 and 3.7 pre-installed. It also provides separate instances of pip, one for each version:
- The command
pythonruns Python 2.7 and is located at/usr/bin/python - The command
python3runs Python 3.7 and is located at/usr/bin/python3 - The command
pipinstalls packages for Python 2.7 and is located at/usr/bin/pip - The command
pip3installs packages for Python 3.7 and is located at/usr/bin/pip3
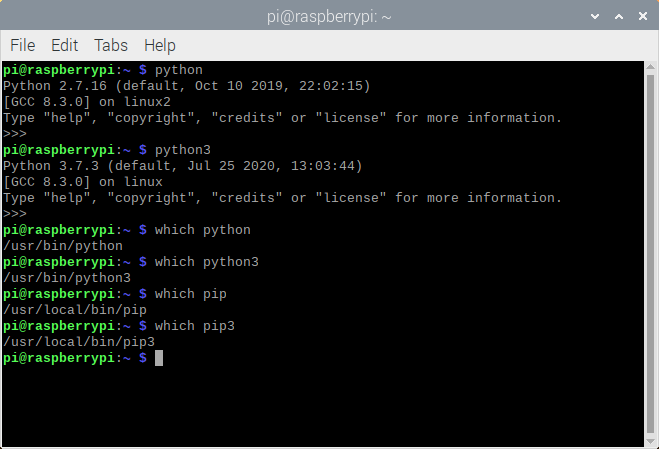
It’s useful to verify your own state of affairs when it comes to the python and pip commands before starting to use virtual environments. More information about your pip instances can be found by running the command pip debug or pip3 debug.
The equivalent information on my Linux computer, which runs Ubuntu is almost identical to this (except that it’s Python 3.8); and it’s very similar on my Macbook, except that the only system Python is 2.6, and I used brew to install Python 3.8 so it’s located at /usr/local/bin/python3 instead (along with pip3).
Installing virtualenvwrapper
You’ll need to install virtualenvwrapper using your system pip for Python 3:
sudo pip3 install virtualenvwrapperThe next step is to configure your shell to load the virtualenvwrapper commands. You do this by editing your shell’s RC file (e.g. .bashrc, .bash_profile or .zshrc) and adding the following lines:
export VIRTUALENVWRAPPER_PYTHON=/usr/bin/python3
export VIRTUALENVWRAPPER_VIRTUALENV=/usr/local/bin/virtualenv
source /usr/local/bin/virtualenvwrapper.sh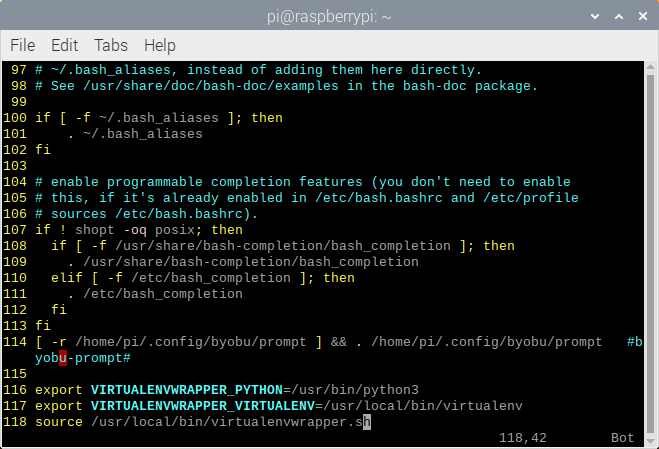
If your Python 3 is located elsewhere, this should be corrected in the first line.
Now close your terminal and reopen it for this to take effect. The first time you open the terminal you should see some output from virtualenvwrapper. This will only happen once, as some directories are created as part of the setup.
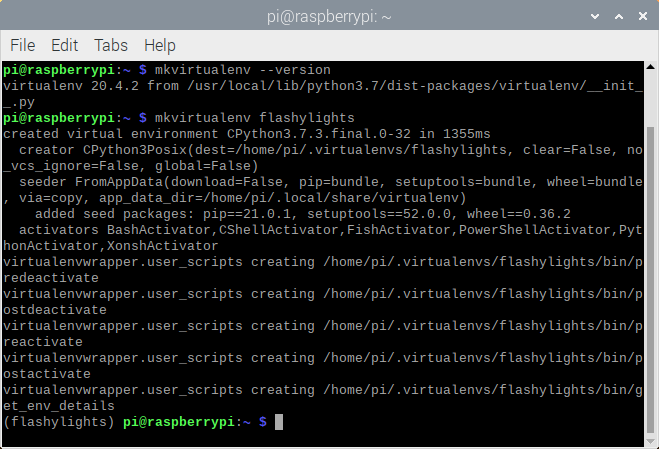
Now you should be able to type the command mkvirtualenv --version which will show that virtualenvwrapper is installed.
Creating a new virtual environment
Let’s say you’re working on a project called flashylights. To create a virtual environment with this name, run the command:
mkvirtualenv flashylightsNow the environment has been created and activated. You’ll see that (flashlylights) appears before your prompt:
Now that the environment is activated, things have changed. The python now points at a completely different instance of Python than the ones you identified on your system earlier. It’s created a directory for your environment and placed a copy of the Python 3 binary, the pip command and more inside it. Now type which python and which pip to see where they’re located:
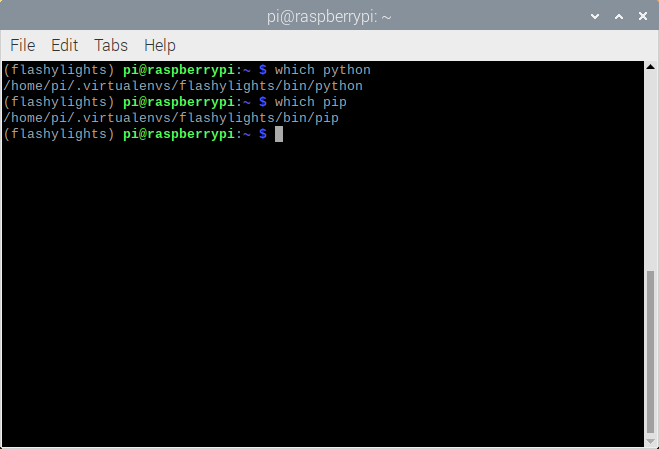
Now if you run a Python program, you can run it with python instead of python3, and you can use pip instead of pip3. Any packages you install using pip will only be installed within this environment, and not interfere with your other projects, other environments or your system installation.
To deactivate the environment, run the command deactivate. To re-enable it, run workon flashylights.
You can list all available environments with workon, or use lsvirtualenv. You can delete an environment with rmvirtualenv flashylights.
Adding virtual environments to your development routine is a sensible thing to do. It keeps me from installing libraries I’m experimenting with system-wide, which can lead to problems. I find virtualenvwrapper the easiest way for me to get into that routine and manage my project environments hassle-free and without having to think too much or remember too many commands.
Advanced features
- You can install multiple Python versions on your system (e.g. using the deadsnakes PPA on Ubuntu) and create a virtual environment with that particular version using e.g.
mkvirtualenv -p /usr/bin/python3.9 myproject - You can automate activation/deactivation upon entering/leaving a directory
- You can use the
postmkvirtualenvhook to install common tools every time a new environment is created - See more tips in the docs: https://virtualenvwrapper.readthedocs.io/en/latest/tips.html